
New in GigJack: MIDI changes, band song import, task notes and more

Since our October 19 update, we’ve added MIDI changes per song, song imports from bands into your artist workspace, linked tasks and note history. There are also new controls in setlist live mode, PDF attachments on ledger transactions, an MCP connector and changes to installation and band setup. This post covers changes from October 20 to November 3.
MIDI changes when you open a song
You can now save your own MIDI program changes for a band song. When you enter that song in setlist live mode, GigJack sends the changes to your connected devices. Each member has their own devices and song steps.
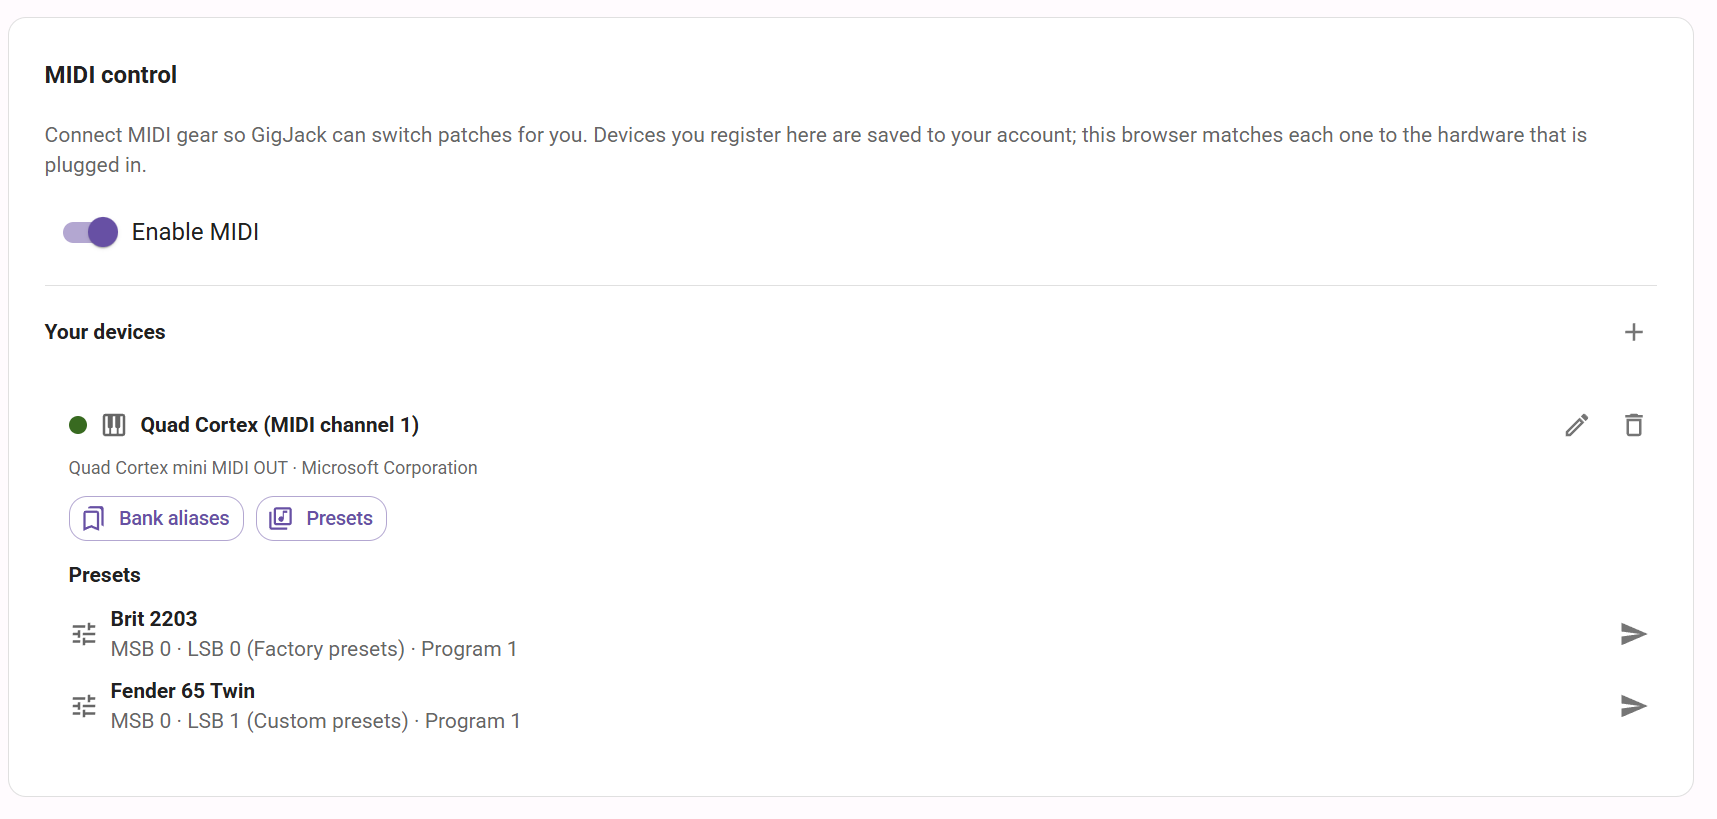
How to use it:
- Open Settings → Hardware → MIDI devices, turn on Enable MIDI and select Connect MIDI. Give the browser permission to access your hardware.
- Select Add MIDI device, choose its output and channel, and save it. Use Presets to save named patches; Bank aliases lets you name bank addresses.
- Open a band song. Under MIDI changes, select Add step, choose a device and pick a saved Preset or enter a Custom patch. Select Add. Drag steps to change their order.
- Start the setlist and connect MIDI when prompted. Entering a song sends its steps. Use Send MIDI again to resend them manually.
In the setlist editor, open a song’s MIDI changes control to inspect its steps. Select Edit on the song page to change them.

A song supports up to 16 steps, with one change per device. Turning pages within a song does not resend the steps, and pauses send no changes. Downloaded setlists include the MIDI values saved at their last sync; refresh the download after changing presets or steps.
MIDI starts switched off. Every member, including a Reader, can configure their own changes, regardless of subscription. Sending requires a browser with Web MIDI support, browser permission and connected hardware. See MIDI devices for setup and program numbering.
Import band songs into your artist workspace
You can copy songs from bands you belong to into your own artist workspace. Each copy keeps a link to its source band song. That link lets you use charts, PDFs and audio from your artist copy in that band’s setlists.
How to use it:
- Switch to your artist workspace and open Repertoire → Songs.
- Select Import → From my bands…. Filter by band or search for songs, select the ones to copy and choose Import selected.
- Add your own material to the imported copy. Open Setlist defaults and set My preferred sheet music and audio.

The import copies song information, lyrics, notes, tags and links. Band charts, uploaded files, the album, cover and rightholders are not copied. Editing your copy does not change the band song, and later changes to the band song do not synchronize to it.
Your choice on a setlist item takes priority, followed by your default on the band song, your linked artist copy’s preference and the band default. Your artist files remain available only to you in these choices. Uploading files and editing charts follow your artist plan’s features.
The import requires Band Gold in the source band or Artist Gold in your artist workspace. A Reader in the source band can import into their own artist workspace. See Import songs from my bands for the selection limits and how to unlink a copy.
Jump to a song and zoom PDF sheet music
Live mode now has a Go to song dialog. Reveal the controls and select the song number between the previous and next buttons. Choose a song from the numbered list to jump to its beginning. The picker also works in downloaded setlists.
For a PDF, pinch with two fingers or use Ctrl/Cmd with the mouse wheel to zoom. Drag the zoomed page to move around it. Fit whole page restores the page view; changing PDF pages resets the zoom. A zoom or drag does not also turn the page.
Long ChordPro charts can be scrolled with a finger, mouse drag or wheel. Page-turn controls move by a screenful before advancing to the next song. See Setlist live mode for the controls.
Tasks linked to contacts and venues
A standalone task can now link to several contacts and venues. Select a task title to open its Details and Notes tabs. In Details, choose the records under Contacts and Venues, then select Save.

Contacts and venues also have a Tasks tab. A task created there is linked to that record. These tabs let you filter open or finished tasks and sort by due date, newest first or title. Tasks belonging to a gig keep their gig link and do not offer the contact and venue fields.

The Tasks overview now loads open tasks first and loads finished tasks separately. Use Show more finished tasks for further results. To reopen a finished task, open its dialog and select Reopen. Contributor or higher can edit task details; a Reader can also reopen a task assigned to them.
Note history on contacts, venues and tasks
The Notes tab now keeps separate entries with an author and date. Open a contact, venue or saved task, enter text under Add a note and select Add note. Task rows show a count when notes exist.
Switch between Newest first and Oldest first, and use Show more notes to load earlier entries. Contributor or higher can add notes and edit or delete their own. Admins can also delete other members’ notes. Edited notes carry an edited marker; the history shows their current text.

A venue’s notes and a linked task’s notes are separate. See Note history for access and editing details.
PDF attachments on ledger transactions
You can now attach supporting PDFs to a ledger transaction that did not come from a purchase. Open the transaction, select Add under Attachments, enter a Description, choose a file with Choose PDF and select Upload.
Each PDF can be up to 10 MB. The list shows its description, filename, uploader and date, with download and delete controls. Adding or removing a file does not change the ledger lines. Transactions from purchases use the purchase’s own attachments.
Financial admins and Admins can read and download attachments. Adding and deleting them also requires Band Gold or Artist Gold. See Ledger entry for the steps.
Connect an AI app through MCP
The new MCP connector lets a compatible AI app read or change supported GigJack data in a workspace you approve. It has tool groups for gigs, rehearsals, events, tasks, venues, contacts and the workspace’s public profile. The profile tools are read-only.
Start the connection in the AI app using https://app.gigjack.com/api/mcp. Sign in to GigJack, select the workspace and review the requested permissions before choosing Approve. In Settings → Integrations and connectors → MCP connector, expand the connection, choose its Tool groups and select Save tools.
The connector requires Band Silver, Band Gold or Artist Gold in the connected workspace. Tools follow your role and approved permissions. They do not expose gig deal finances, bank details or tax identifiers. Review proposed changes before approving them; the connected AI app and its provider process the data you allow it to access. You can revoke a connection with Disconnect.
See MCP connector for setup, permissions and expiry, or our band marketing bot example for a workflow using the connector.
Installation, updates and band setup
Install and apply updates
On Android, the installation dialog offers Install now when Chrome makes direct installation available. The iPhone instructions cover Safari’s Share menu, and links opened inside another app have instructions for opening GigJack in Safari or Chrome first.
When a new version is ready, choose Reload in the notice to apply it. If you close the notice, an Update button remains in the header. Live performance screens suppress the notice. See Install and update GigJack.
Add the lineup and socials while creating a band
Band setup now includes Band members and Socials steps. Add yourself, enter other members’ instruments and positions, and optionally enter their email addresses to send invitations when the band is created. Review the lineup, social links and profile preview at Final check. Both extra steps can be skipped.
For an existing band, Admins can use Invite by email when adding or editing a band member on the profile, or choose an existing approved account under Linked user. Under Settings → Members and invites, an invitation can name the band member it belongs to, and its email status is shown.